Yatse: Kodi remote and cast configuration
Yatse aims to be as simple as possible for all users in it's default configuration.
But also fully embrace all the special needs that more experienced users can have, and provide many options and function for those too.
Click the section of interest for more details.
You can access the settings by clicking the Settings button in the Menu. See Using Yatse: Kodi remote
Remarks:
• Some settings require Unlocker to be used. They will be disabled and marked with a lock icon if you do not have it.
• The settings are separated in different levels with only basic visible by default, you can click on the level header to see the associated settings.
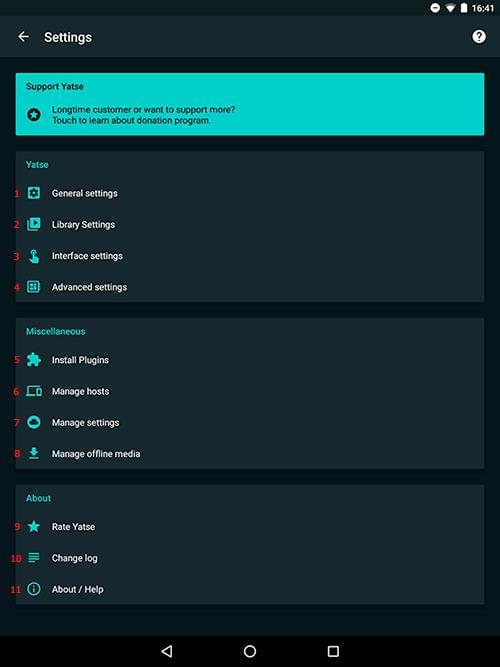
1 General settings: Access the general settings like Notifications or Lockscreen. See: General settings for details on all the different settings
2 Library settings: Access the library settings like Skip season or Ignore article. See: Library settings for details on all the different settings
3 Interface settings: Access the interface settings like Theme or hiding menus. See: Interface settings for details on all the different settings
4 Advanced settings: Access to advanced settings like debug mode for support. See: Advanced settings for details on all the different settings
5 Install Plugins: Touch to download plugins on Play Store for example:
• Call plugin: Pause media when receiving a call and / or display a notification.
• SMS plugin: Display your SMS on the big screen.
• Wave plugin: Control your Media Center without touching your phone.
• Notification plugin: Forward any Android notification to your Media Center.
6 Manage hosts: Touch start managing your hosts. (See below)
7 Manage settings: Allow backup / restore / reset or cloud save actions on your settings. (See below)
8 Manage Offline Files: Allow you to manage the media you have synced on your device.
9 Rate: Rate Yatse on Play Store.
Your ratings are very important to us as it's the proof of quality that make us known.
Please use the issue tracker for support as we have no way to contact you back from Play Store comments
10 Changelog: Display all changes in Yatse versions so you do not miss a new feature.
11 About: Display information about Yatse and links for support or all social network to follow us.
Use this screen to manage all your Media Center hosts.
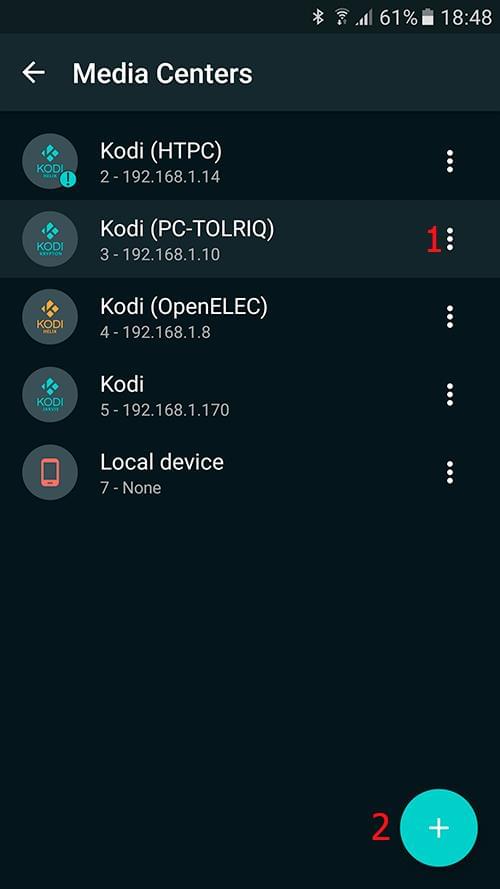
1 Host list: Touch any host to make it active. Press the 3 dots button to open action menu.
2 Add host: Touch to add or import hosts.
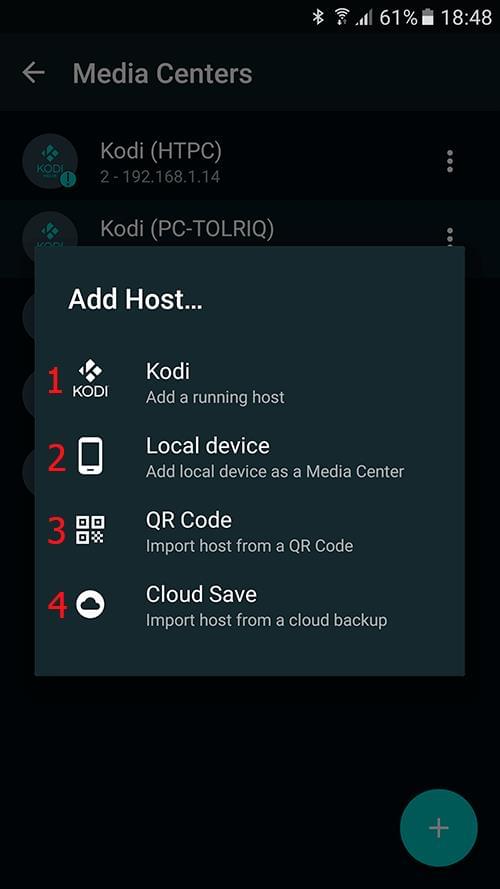
1 Add a Kodi host: Add a Kodi host to control it.
2 Add Local Device: If you have removed it, use this to add back the Local Device Media Center.
3 QR Code: Touch to import an host from an exported QR Code.
4 Cloud Save: Touch to import hosts from your Cloud Saves. (See below)
When you add an Kodi host a wizard start to help you.
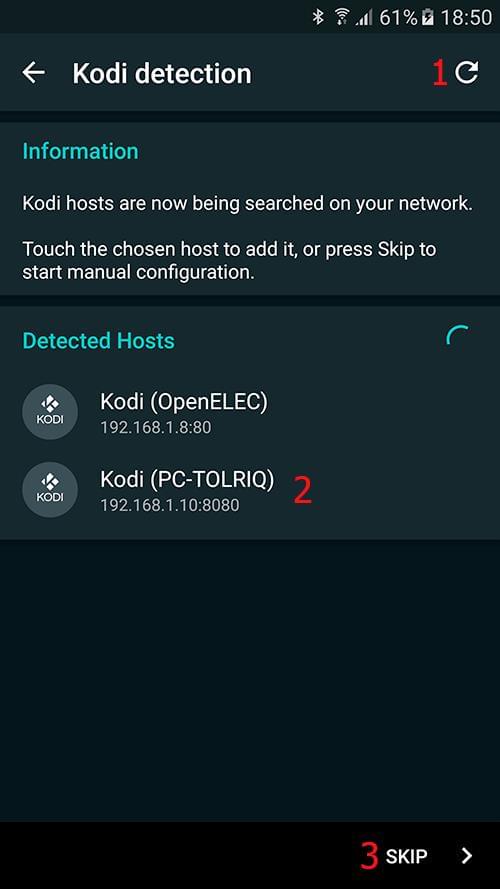
1 Refresh; Touch to restart the host detection routine.
2 Detected Host list: If your Kodi have Zeroconf activated (See Kodi Configuration then Yatse will list all discovered hosts).
Click on any host to start it's configuration.
3 Skip: If no host is detected automatically either because of missing Zeroconf or no multicast support, touch Skip to start manual configuration.
Remark: Your host must be up and configured before trying to add it.
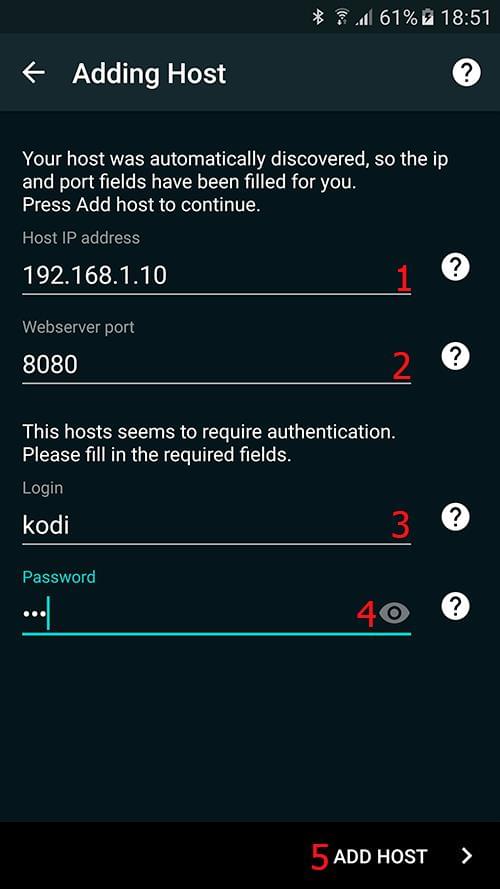
1 Host IP: The IP address of your Kodi, please see Kodi Configuration and Kodi Network details for details on how to get this value.
If your network configuration allows DNS resolution, then you can use an hostname.
2 Webserver port: Set this to the Kodi host port you configured (Kodi Configurationn)
3 Login: Set this to the Kodi login configured (Kodi Configuration)
This field will only shows up if your host requires authentication
4 Password: Set this to the password you configured (Kodi Configuration)
This field will only shows up if your host requires authentication
5 Add host: Add the host to Yatse. (This will trigger all checks to validate that your settings are correct and make the login / password field appears if needed)
Press Add host when all fields are filled.
If there's any error, the wizard will explain you and guide you for resolution.
Remark: You can press the help buttons at any time for details on each input fields
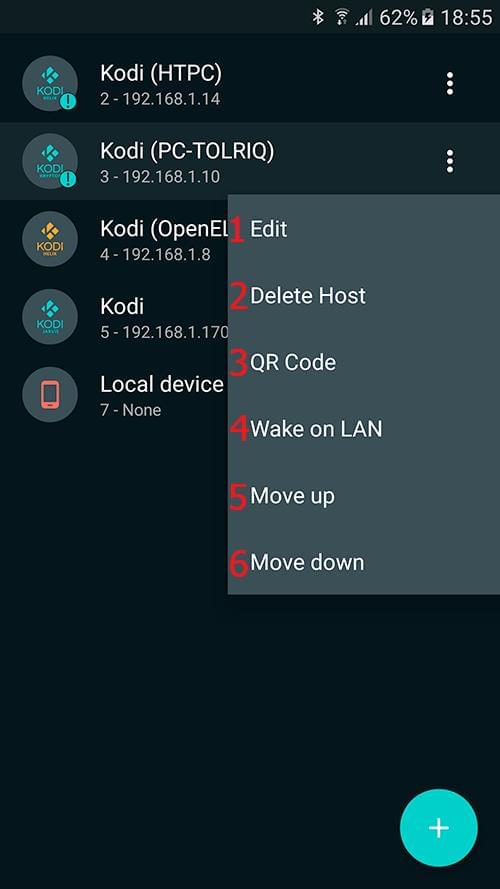
When you edit an host you have access to all it's settings.
You can swipe between the 2 tabs to access all settings or press the tag header
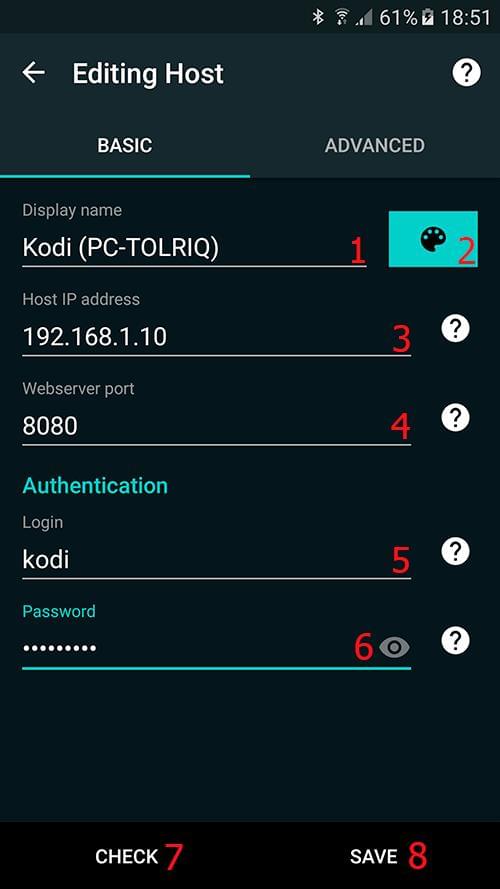
1 Display name: This is a display name so you can easily select hosts when managing multiple ones.
2 Color: This is the color associated to your host and used in multiple part of Yatse. Touch it to select one of many available.
3 Host IP: The IP address of your Kodi, please see Kodi Configuration and Kodi Network details for details on how to get this value.
If your network configuration allows DNS resolution, then you can use an hostname.
4 Webserver port: Set this to the Kodi host port you configured (Kodi Configuration)
5 Login: Set this to the Kodi login configured (Kodi Configuration)
6 Password: Set this to the password you configured (Kodi Configuration)
7 Check: Touch to do live tests. You host must be running for the tests to success
8 Save: Save your changes, only values data is checked before save, it's recommended to verify all settings with the check button
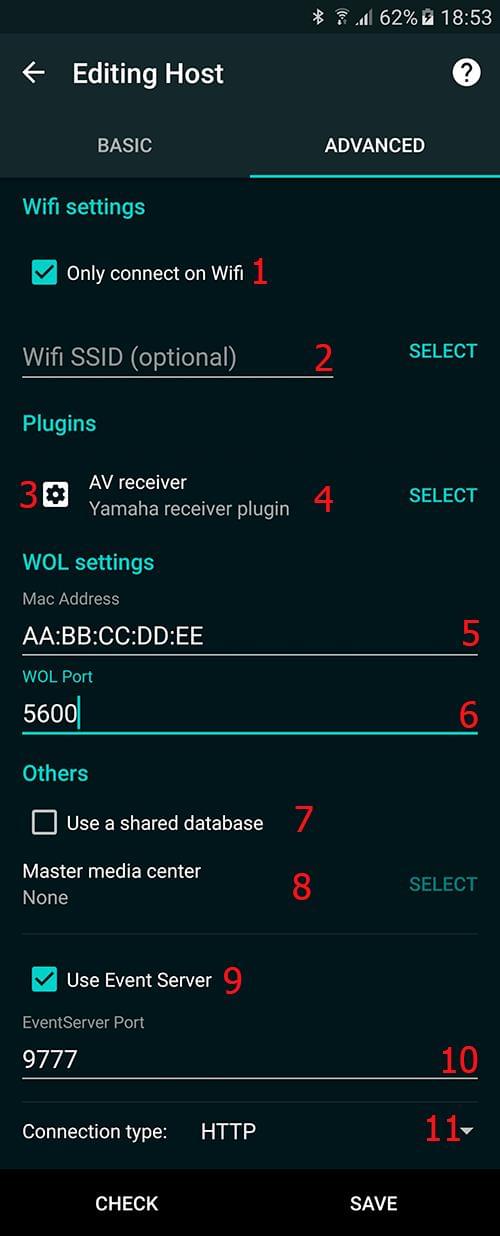
1 Only wifi: When checked Yatse will not try to communicate with your host if you are not connected to Wifi.
2 Wifi SSID: You can tell Yatse to only communicate with your host when connected to chosen SSID.
Touch the Select button for a quick list of known SSIDs.
3 Configure Plugin: When you have selected an AV receiver plugin for this host, click this button to configure and test it.
4 Select Plugin: Click on this button to choose an AV receiver plugin for this host.
5 Mac Address: Set this to your host Mac Address. This value should be auto detected.
And is only needed for Wake on LAN function.
6 WOL port: Set this to the port used on your router for WOL forwarding.
Remark: This port is also used for XBMC Starter.
7 Shared database: This allows you to share the database on your device with more than one host managed by the device. This is useful when you have multiple hosts sharing a Mysql database.
Select this option on all hosts that will share the database except for one that will act as the master. This will allow any host to sync the shared database between all hosts.
8 Select master database: Use this button to select the master host.
Remark: Any host will be able to synchronize the data, this only serves as a reference internally for Yatse.
9 Use Event server: Allows Yatse to work without Event Server, this is really not recommended, but can be useful when opening Kodi to Internet and avoid insecure protocol redirection.
10 Event server: Usually you should not change this value.
If you need to remote control from internet multiple hosts, then you can change this value here and in Kodi configuration files.
11 Connection type: Usually you should not change this value.
You can change to HTTPS or HTTPS without certificate checks if you have a working reverse proxy and need this. We do not provide any support on the remote proxy configuration part.
Use this screen to manage the image cache of Yatse for perfect offline library viewing.
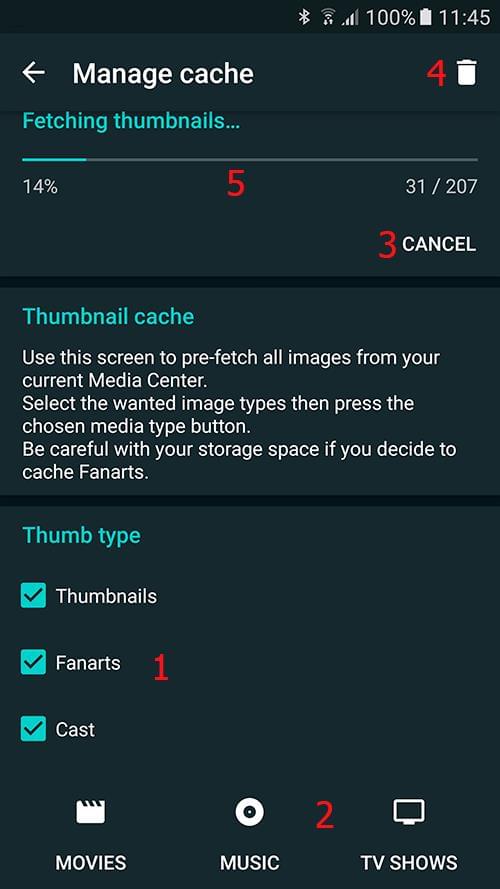
1 Thumb type: Select all thumb type that you want to download. (Beware of space used when downloading all Fanarts.)
2 Media type: When you have chosen the thumb type, click on the media type button to queue all corresponding images.
3 Cancel: Cancel currently downloading images.
4 Clear Cache: Clear all currently cached images.
5 Download queue: Display the current download queue.
Remark: If you change a lot your library content you should clear cache and fill it again from times to times to free some unused items.
If you leave this screen with Android home button the download will continue in background.
Start cloud save, to backup and restore settings in the cloud. (See Below)

Export your settings to sdcard for future import.

Import previously exported settings.
Remark: The exported file must be in the indicated directory.

Revert all your setting to default values.

Cloud save allow you to backup your settings and your hosts to Google cloud and easily restore them on multiple Android devices as needed. Just sign-in with your Google Account then export or import your settings and hosts.

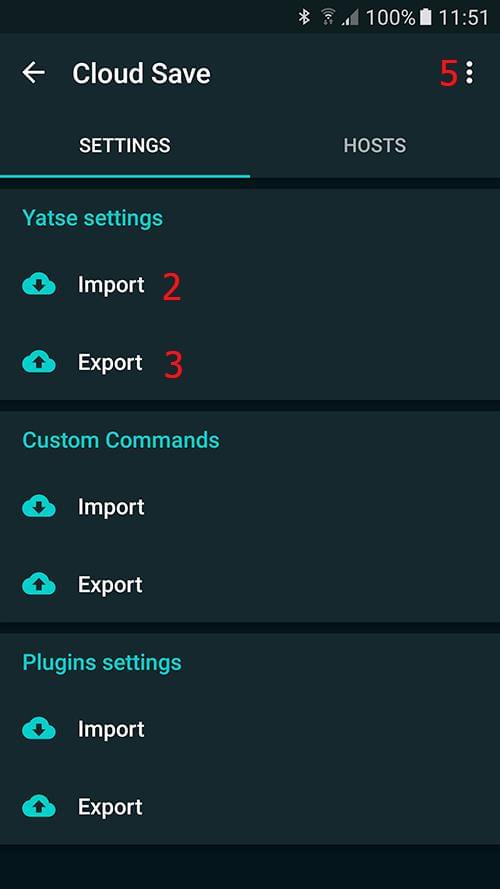
1 Sign-In: Touch to sign-in with your Google account.
2 Import: Import your settings from a previous backup. (You can also import your custom commands and plugin settings)
3 Export: Export your settings for a future import. (You can also export your custom commands and plugin settings)
4 Host list: Click on any host to either export it to the cloud or import it.
Remark: Since hosts id changes between hosts if you use the Master database settings, you need to edit your hosts after import to set it again.
5 Menu: Menu to get access to Sign-out command and clear backups to delete all your saved data on your Google account.
Remarks:
• You can at any time click the overflow menu icon to clear all the saved data then sign-out to disable this function.
• All your data is stored securely on your account and nobody including Yatse's authors have access.