How to use Yatse: Kodi remote and cast

Yatse aims to be as simple as possible for all users in it's default configuration.
But also fully embrace all the special needs that more experienced users can have, and provide many options and function for those too.
You can see some videos of Yatse features on Youtube or in the Screenshots and videos section of the Wiki
Click the section of interest for more details.
When you start the application from your launcher by default the Remote view is shown if your last selected player supports remote commands.
You can configure the start page in the settings.
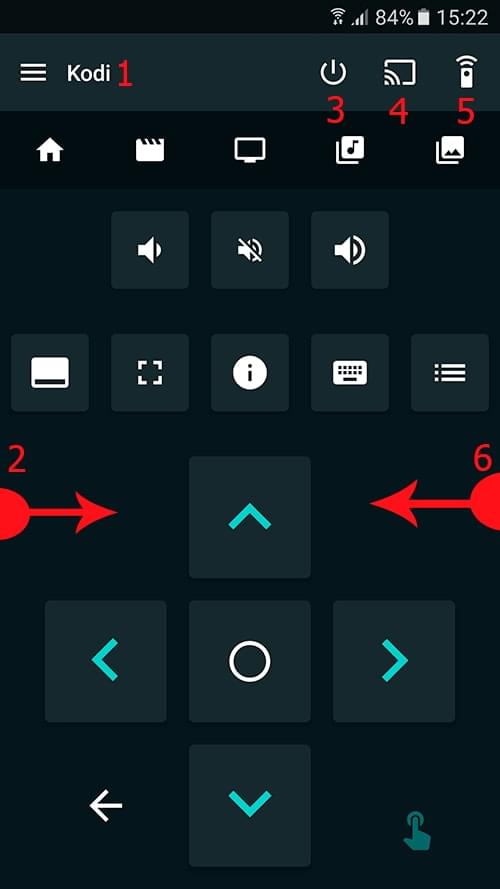
1 Current Media Center: This show your current Media Center.
A subtitle line will indicate if your host is currently offline or if you are currently casting.
You can touch it or the icon on it's left to quickly open left menu.
2 You can bezel swipe from the left to show the menu. (Start swiping left to right from outside of the screen)
3 Power button: Send power commands to the current player.
4 Cast button: Select your target player to stream your media. (Use the same button to stop casting)
5 Custom Commands: Allows you to add and use infinite number of commands to control and access 100% of Kodi API and more.
6 You can bezel swipe from the right to show the custom commands panel. (Start swiping left to right from outside of the screen)
The left menu is the main way to navigate inside Yatse. See previous screen for the 2 ways to open it.
Remark: You can hide and show the entries you want in the settings.
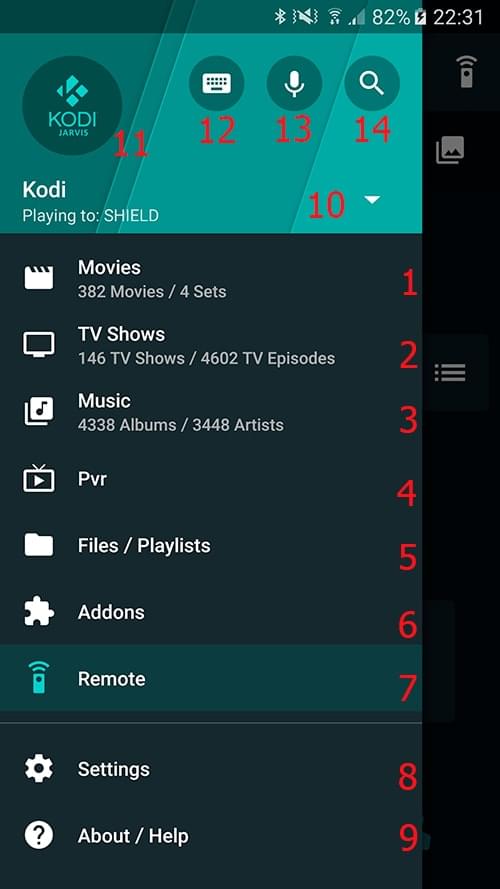
1 Movie library: Click to access Yatse's copy of your media center movie library.
A long press will force a synchronization of the movie database.
2 TV Show library: Click to access Yatse's copy of your media center TV show library.
A long press will force a synchronization of the movie database.
3 Music library: Click to access Yatse's copy of your media center music library.
A long press will force a synchronization of the movie database.
4 PVR: Touch to access your Kodi PVR including full EPG and access to recordings.
5 Files: Direct access to your Media Center files and playlists.
Since Yatse can not cache this content you need to be connected to access it.
6 Addons: Direct access to your Media Center addons if they are supported.
Since Yatse can not cache this content you need to be connected to access it.
7 Remote: Go to Yatse main screen for direct remote control.
8 Settings: Go to Yatse settings where you can configure nearly every aspect of the application.
9 About / Help: Go to Yatse internal help. Also contains direct buttons to contact the support.
10 Host icon: Touch to to access quick action menu (Power actions / WOL). A status icon will be shown to indicate offline status or syncing status.
11 Power commands: Clicking on the Media Center icon display power commands to easily power off or start Wake On Lan.
12 Virtual keyboard: Display a virtual keyboard to send text to your Media Center.
Long press the button to be in keymap mode and simulate real keyboard keypresses.
13 Voice commands: Start Yatse voice command processor to command your Media Center with the voice.
See Voice Commands for details. You can long press the icon as a shortcut for the help page.
14 Global search: Allows to search media in all Yatse databases (Albums, Songs, Artists, Episodes, Movies).
The host list can be accessed from the left menu for quick change (See previous image for how to open it).
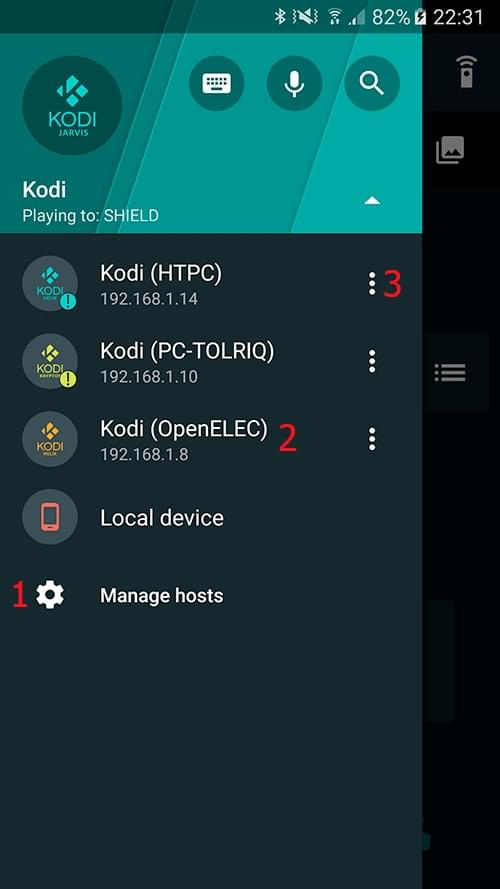
1 Click to manage your hosts.
2 Click on the chosen host to connect.
3 Click to open quick action menu (Power actions / WOL)
The main Yatse remote screen allows full remote control actions on your Media Center
See Basic Yatse usage (above) for details on Action bar icons and usage.
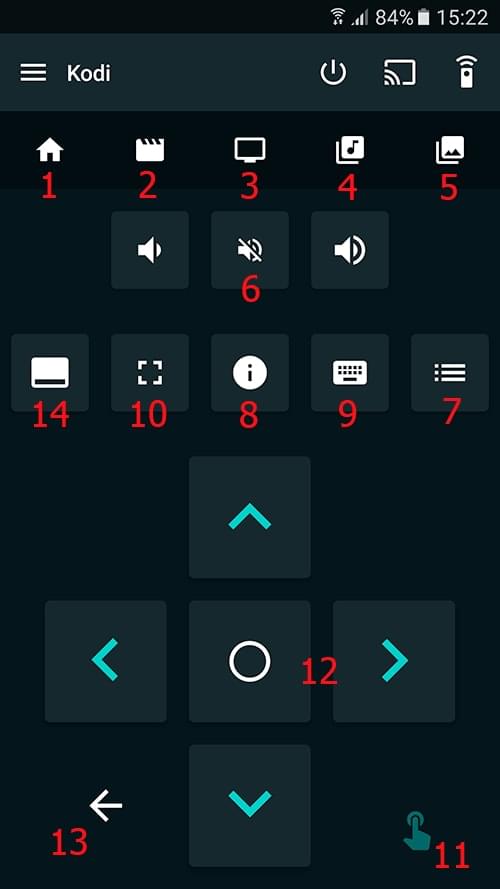
1 Home: Click to go to the home of your Media Center.
If Internal shortcuts option is set toggle the display of Yatse menu. (Note that long press on that button does the opposite action)
2 Movie library: Click to go to your Media Center Movie library screen.
If Internal shortcuts option is set toggle the display of Yatse Movie library. (Note that long press on that button does the opposite action)
3 TV Show library: Click to go to your Media Center TV Show library screen.
If Internal shortcuts option is set toggle the display of Yatse TV Show library. (Note that long press on that button does the opposite action)
4 Music library: Click to go to your Media Center Music library screen.
If Internal shortcuts option is set toggle the display of Yatse Music library. (Note that long press on that button does the opposite action)
5 Pictures: Click to go to your Media Center Picture library screen.
If Internal shortcuts option is set toggle the display of Yatse Picture library. (Note that long press on that button does the opposite action)
6 Volume controls: Control your Media Center volume.
Remark: Some Media Center can operate in pass-through mode and then the volume is handled by you amplifier. Yatse propose plugins to handle the receiver in that case.
7 Context menu: Display the context menu on your Media Center screen.
Long press to display the OSD on your Media Center.
8 Information: Display information on current state in your Media Center.
9 Keyboard: Display a virtual keyboard to send letters 1 by one to your Media Center.
Long press displays a paste dialog so you can send a complete text / url to your Media Center.
10 Display: Toggle current display mode on your Media Center.
Long press multiple times to change aspect ratio.
11 Gesture / Buttons: Toggle the way to control your Media Center from arrows to gesture pad.
Remark: When in gesture mode a tap send select, double tap back command and long press the context menu command.
You can swipe while keeping pressed for fast scrolling.
12 Select: Send select / enter command to your Media Center.
Long press to send a title command to your Media Center.
13 Back: Send back command to your Media Center.
Remark:Remark: When in gesture mode a double tap also send a back command.
14 Menu: Send OSD command to your Media Center.
When something is playing a bottom bar is visible in every screen of Yatse.
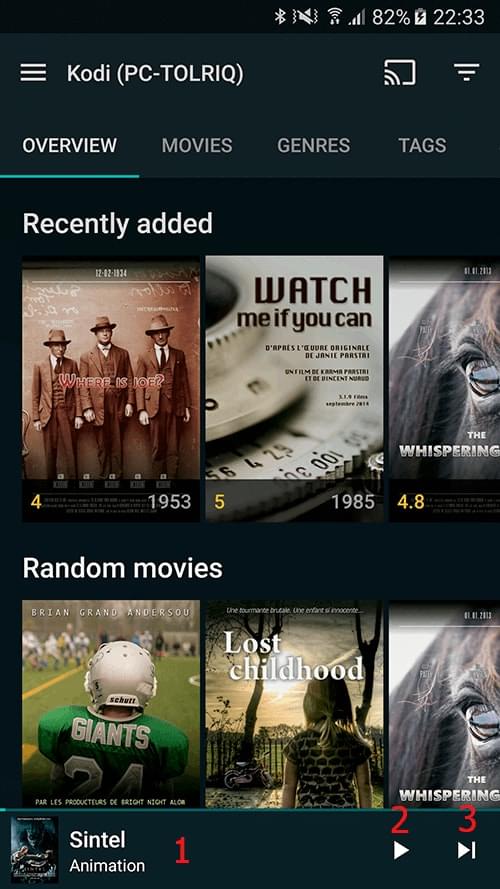
1 Open now playing: Click to open the full now playing screen. Note that you can swipe up the bar as a shortcut.
2 Play / Pause: Click to play or pause current media. Long press that icon will stop the media!
Remark: You can configure the visible buttons in that bar in the settings.
3 Next: Move to next media in the playlist.
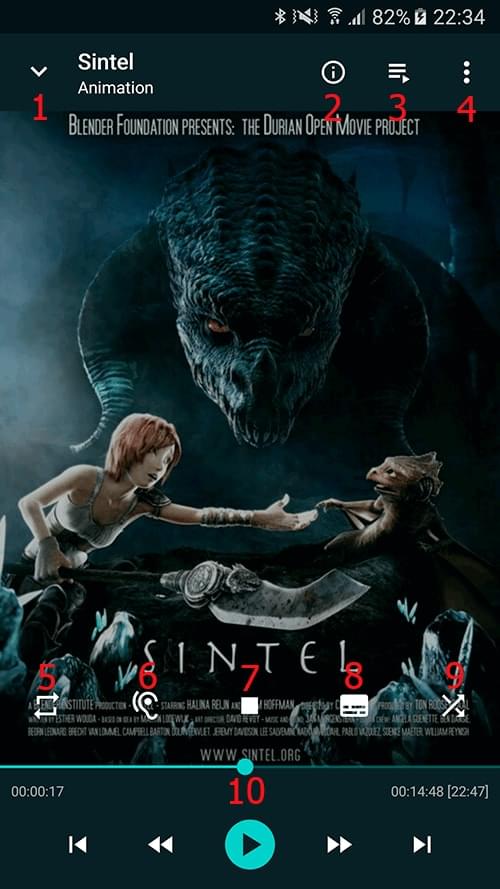
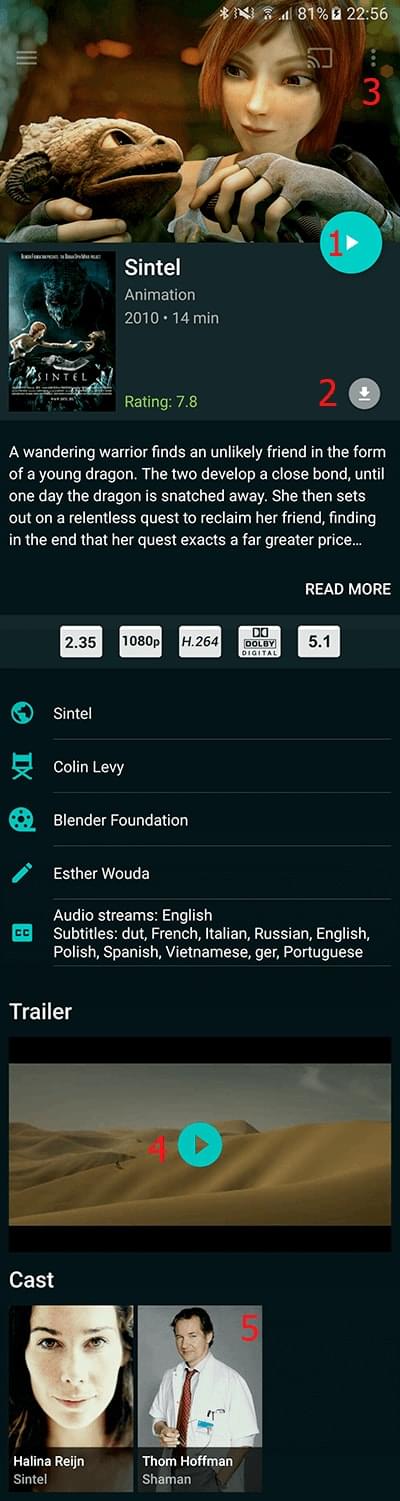
1 Close: Reduce the now playing screen to it's bottom bar size.
2 Details: Display the available details about current media. You can press anywhere in the large image to have the same dialog displayed.
3 Playlist: Display the current playlist. Press again to close the playlist. You can swipe up over the main large image to display current playlist too.
4 Menu: Display additional possible actions depending on the media.
5 Repeat mode: Toggle repeat mode between None / All / One.
6 Audio language: Click to select the current audio stream and show options like audio delay and amplifications. (Long press the icon for stream rotation, needed for MPC users)
7 Stop: Click to stop current media.
8 Subtitles: Click to select the current subtitles, enable / disable them, download or adjust delays. (Long press the icon for subtitles rotation, needed for MPC users)
9 Random: Toggle random mode.
10 Seek bar: Click the seek bar to jump to the position.
Click and drag the slider for more precise seeking with an indicator of target time.
Long press the seek bar to display a dialog for very precise time seeking.
There's a settings to disable the seek bar and always displays a dialog when clicking it.
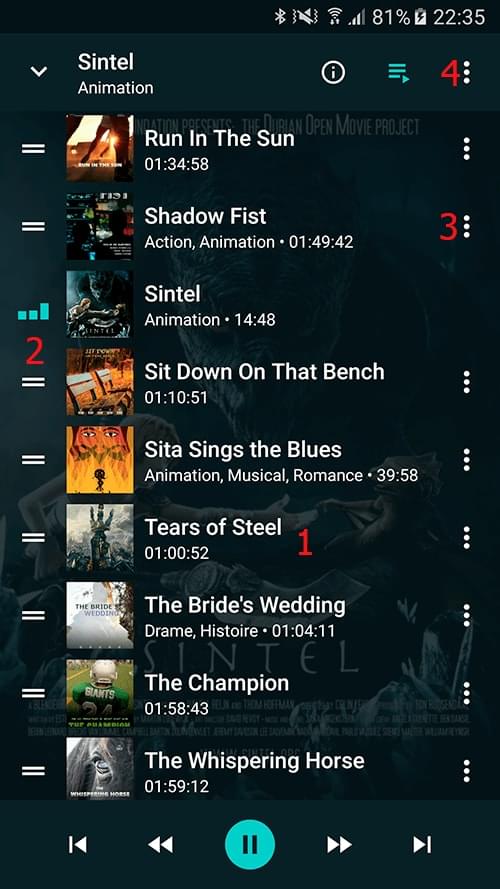
1 Media: Click any media to start playing this specific media.
2 Indicator & drag handler: Allows to reorder the playlist items by drag and dropping this handler. The animation indicate currently playing media.
3 Media Menu: Open the media menu action. Use this menu to remove items from the Play list.
4 Global menu: Open the now playing menu. (Contains the clear all playlist command)
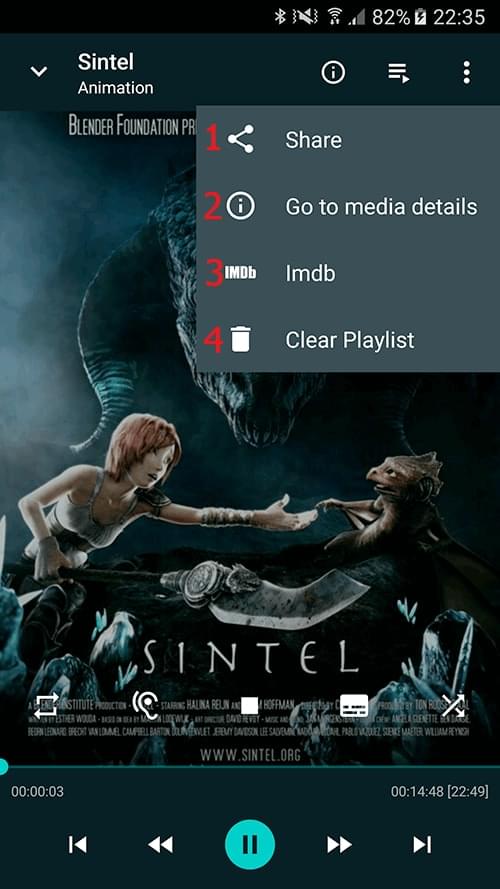
1 Share: Share currently playing media to social networks.
2 Details: Open the current media details available in Yatse database.
3 Imdb: If the information is available will open IMdb website with details on current media.
4 Clear Playlist: Clear current playlist.
See Basic Yatse usage (Above) for details on how to access the library.
Yatse synchronize your Media Center database with a local one so you can browse your media anywhere.
The synchronization is automatic but can be disabled in settings
Tips: You can still force a synchronization by long clicking the corresponding media type in the left menu (Movies, Tv Shows, Music) or swipe down any media listing.
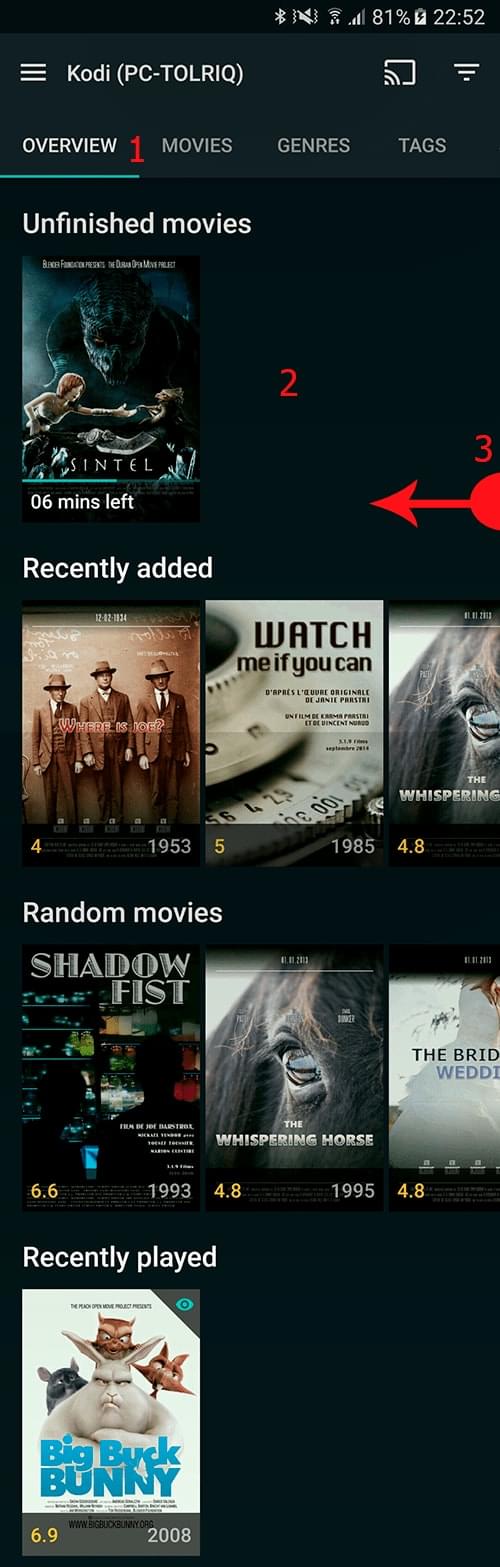
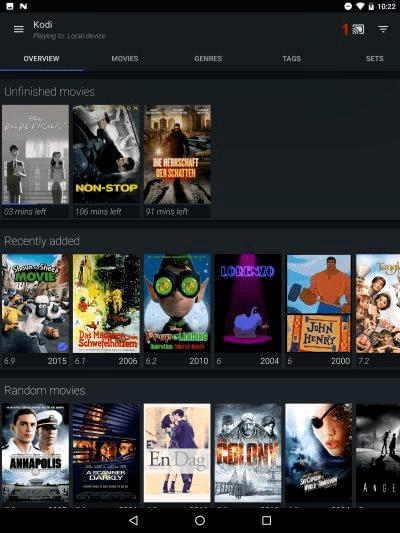
1 Navigation tabs: Quickly change the content tabs, you can swipe left / right to move between tabs too.
2 Media listing: Display the library content, each main media type also propose an Overview tab that will list the most interesting media from your library, like unfinished movies / episodes, or next episode in a started show.
3 Quick remote: You can access the quick remote screen from anywhere in the application.

1 Search: Filter current list by searching terms.
2 Cast: Change the target player, see below for more details.
3 Sort, Filter and Layouts: Change the sorting of the media, add some filtering or change the layout of the displayed items.
4 Browse: Select any tab to browse the different sections of your library.
5 Play: Display a menu for quick play actions, like starting a random media in the selection or the next unwatched.
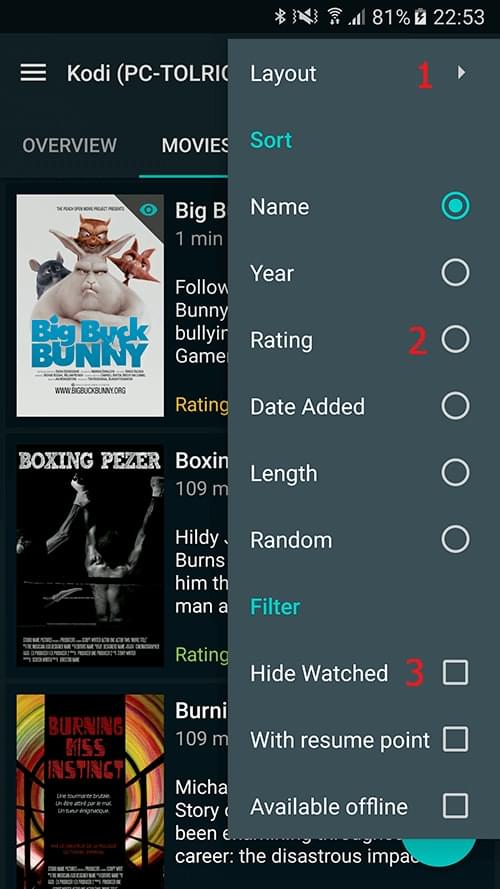
1 Layout: Change the layout of displayed items, see screenshots for all different kings.
2 Sort: Sort the media like you want. Click again on the same sort to invert it (From ascending to descending)
3 Filter: Filter the media based on some criteria.
Notes:
• The layouts/sort and filter content depends on the type of media currently displayed.
• You can long press most of the media in listing to quick access most of the available actions.
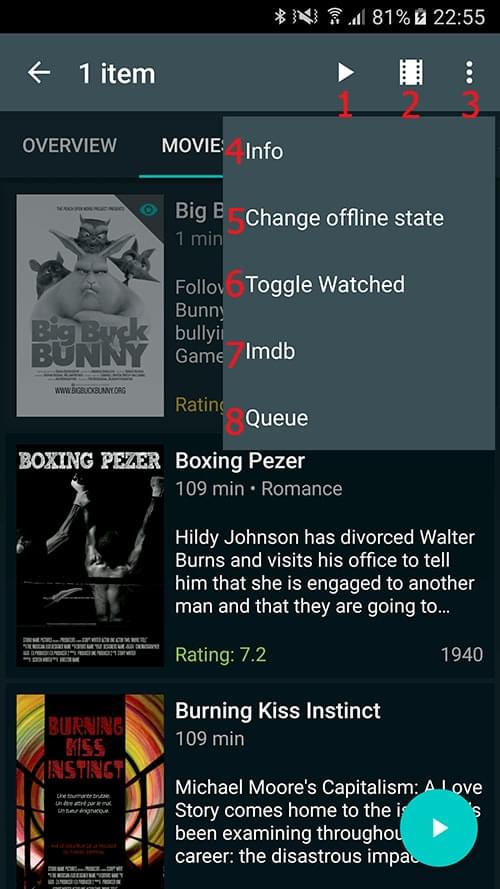
1 Play: Start the media on your Media Center or your target player if you are casting.
2 Trailer: Play the trailer if available.
3 Overflow: Display the rest of the options.
4 Info: Display the detail view.
5 Offline toggle: Click the pin button to start offline downloading or to remove already downloaded content.
6 Toggle watched: Toggle the watched status of the media.
7 IMDb: If available show details on IMDb web site or application.
8 Queue: Add the media at the end of current now playing queue.
Remark: The content of the menu is dynamic and based on the type and status of the media as well as your connection status. Experiment long press everywhere to discover all shortcuts.
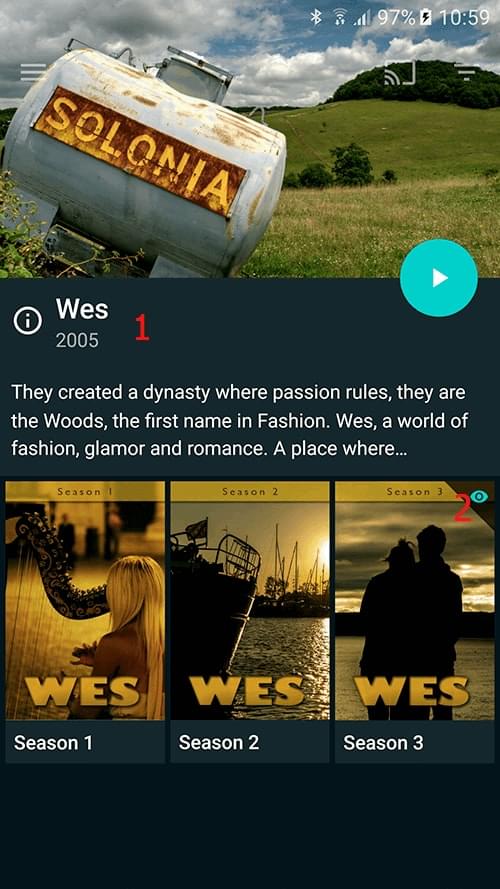
1 Info panel: When browsing sub categories like an album or a Tv Show this panel give some small details about the root media, pressing it will open the complete details screen.
2 Watched indicator: This indicator shows that the media was already completely watched.
After clicking on a media or long pressing it and choosing the info button, the detail view is shown
1 Play: Start playing the media, if there's a resume point or something is currently playing, a menu with option will be shown.
2 Offline toggle: Click the pin button to start offline downloading or to remove already downloaded content.
3 Additional menu: Displays more possible actions for this media.
4 Trailer: If available start playing the trailer on your local device (Youtube).
5 Cast: Clicking any actor will open a new media browser showing all the media this actor acts in your library.
Remark: The contents of the menus are dynamic and based on the type and status of the media as well as your connection status.
Streaming is now easier than ever, you just have to select the player with the cast button.
All supported future media will be played on the selected player.
If something is playing when you change active player you even have the option to migrate the media and active playlist to the new player.
1 Thumb type: Select all thumb type that you want to download. (Beware of space used when downloading all Fanarts.)
After pressing that button you'll see the following screen.
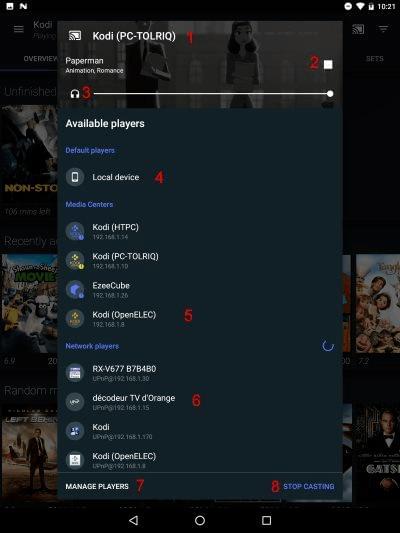
1 Connected player: If you are currently in streaming mode displays the name of the target player.
2 Current streamed media: If you are currently playing a media on the target player displays some information and allows stopping of the playback.
3 Volume control: If you are connected to a remote player, allows direct volume control.
4 Local device: Select this player to have the media played on your device. Music and pictures will be played natively by Yatse, videos will use your chosen external player like Mx Player (Recommended for subtitles and resume point / watched status synchronisation)
5 Target Media Center: You can select one of your configured Media Center for streaming. This feature is currently free so you can finally enjoy all your media on all your Kodi without the need for Mysql or faulty UPnP implementation.
6 Network player: You can select any supported network player like UPnP / Chromecast / Airplay devices. Please remember that Kodi does not do transcoding so your player needs to support the codecs of your media.
7 Manage players: Allows you to hide the network players you know you'll never use to cleanup the default list.
8 Stop Casting: Stop using the selected player as a player and return to default player (Usually the player of your source Media Center)
When a media is playing on current player and you change the target player (either by selecting a new one, or pressing the stop cast to return to default player) a dialog will be shown to ask you what to do.
This allows you to seamlessly migrate your media and playlist between players
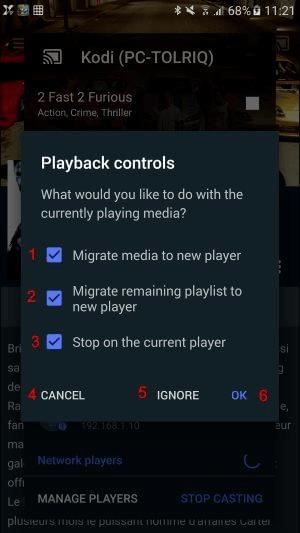
1 Migrate media: If checked, this will start playing the media on the new player at the current position.
2 Migrate playlist: If checked, the remaining playlist will also be migrated to new player.
3 Stop: If checked, The media will be stopped on previous player.
4 Cancel: Cancel the player change.
5 Ignore: Does nothing about current media (Ignoring the checked options above)
6 OK: Applies your checked choices. Nothing selected is identical to Ignore.
Subtitles: Yatse can stream external subtitles when using Mx Player, VLC, Chromecast or UPnP.
But due to Kodi limitations this does not work with the Force UPnP Server option.
The subtitles needs to have the same name of the media and be in the same folder. (It does support language information, so a movie named toto.mkv can have subtitles named toto.srt or toto.en.srt)
Remarks:
• Yatse only act as a gateway between Kodi and a player, if some of your media do not work there's nothing I can do about it.
(Typically iso files can't be streamed since Kodi does not do any transcoding)
• If you buy unlocker only for this reason you should first try to use a UPnP application and see if you can stream your media.
• On recent Mx Player release AC3 / DTS are removed, you can still activate it by following for example: XDA link
• As the application descriptions explains, Kodi does not allow direct streaming of PVR and addons. For addons you can still start them on Kodi then migrate the player from Kodi to a target player like your device or Chromecast.
If you have any problems with Streaming please take time to read: Resolve Streaming issues as there's some Kodi side configuration that may be needed to solve permission problems.
Yatse support offline syncing of your medias. Allowing you to bring your medias everywhere.
You can start the sync of movies, seasons, episodes, music videos, albums, artists and songs by either long clicking them and choose the Change offline state button or press the pin button in detail screens.
Clicking again on the same option will propose to delete the already downloaded content.
When some media are syncing a notification is displayed that give you access to the download queue manager by clicking on it.
You can manage already downloaded media from Yatse settings.
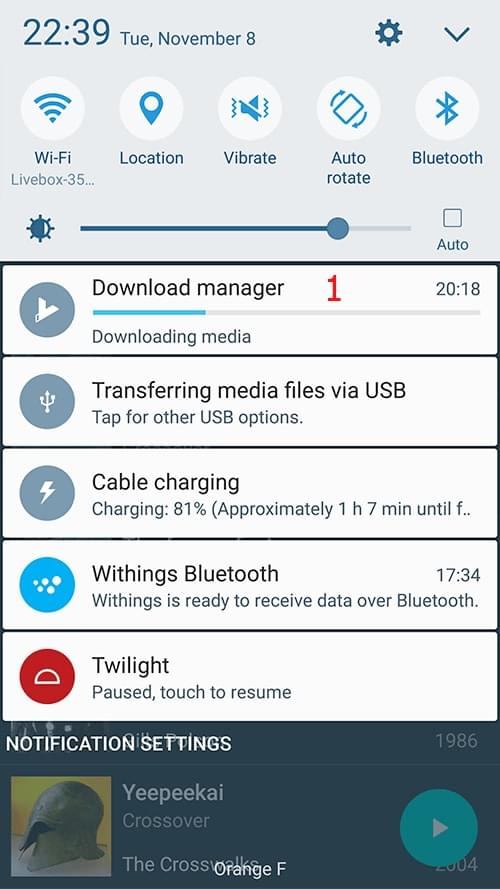
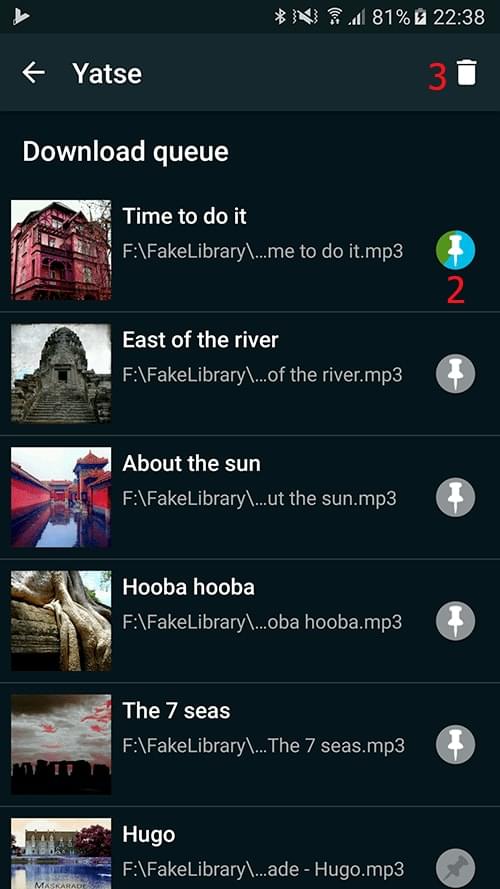
1 Notification: Click the notification to display the queue manager.
2 Pin button: Click on this button for action on the selected item. Depending on the situation you can : • Cancel a download and delete the content • Resume a paused download • Retry a download in error • Pause a download (This option requires you to click on resume to put back the media in the download queue. The currently downloading item is green, waiting ones are grey, and failed ones are red.
3 Clear: Clear the remaining download queue.
Remarks:
• Once files are downloaded a blue pin icon will be displayed in top left corner in all listings.
• You can use the filter: Available offline in all sort menu to filter on offline media.
• You can check the option Interface / Automatic offline filter to have this filter automatically toggled depending on your connection status.
Yatse have greatly improved since it's beginning as only widgets but still propose lots of widgets to fill all your needs.
Please refer to your Android launcher documentation for help on adding widgets to your home.
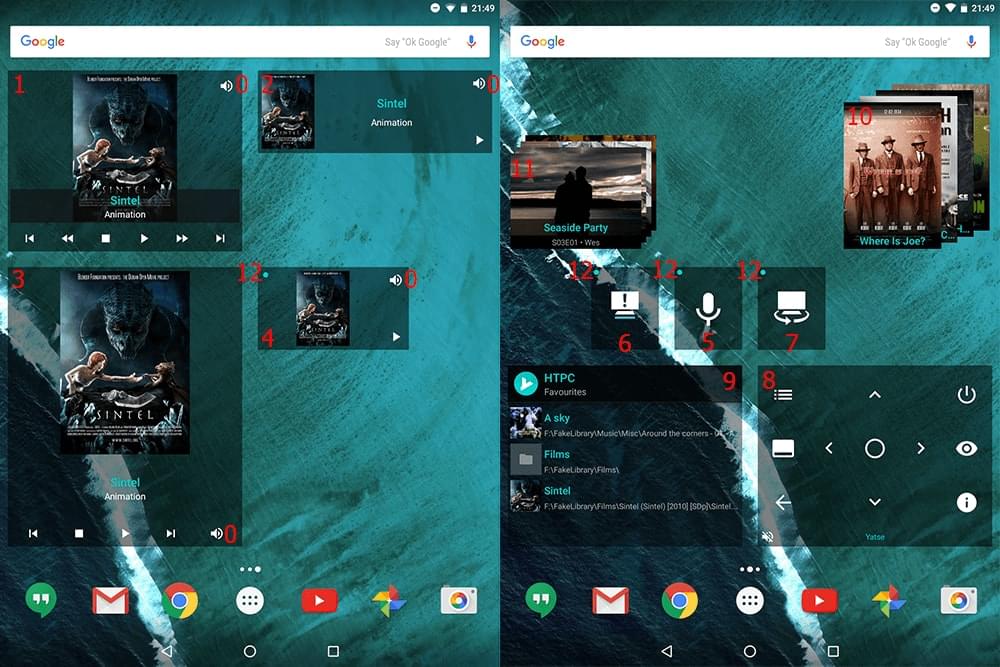
0 Configurable button: You can change the action of the button in settings see (Configure Yatse).
1 Yatse Widget (4x2): Display now playing information. Click on image or text to start Yatse.
Remark: Since this widget needs to know your Media Center status even when Yatse is not running a service will check the status and battery usage may increase a little.
You may want to configure your host to Wifi only an set a correct Wifi SSID to limit this impact.
2 Yatse Widget (4x1): Display now playing information. Click on image or text to start Yatse.
Remark: Since this widget needs to know your Media Center status even when Yatse is not running a service will check the status and battery usage may increase a little.
You may want to configure your host to Wifi only an set a correct Wifi SSID to limit this impact.
3 Yatse Widget (4x1): Display now playing information. Click on image or text to start Yatse.
Remark: Since this widget needs to know your Media Center status even when Yatse is not running a service will check the status and battery usage may increase a little.
You may want to configure your host to Wifi only an set a correct Wifi SSID to limit this impact.
4 Yatse Widget (2x1): Display now playing information. Click on image or text to start Yatse.
Remark: Since this widget needs to know your Media Center status even when Yatse is not running a service will check the status and battery usage may increase a little.
You may want to configure your host to Wifi only an set a correct Wifi SSID to limit this impact.
5 Yatse Voice Commands: Directly command Yatse from your voice see: Voice Commands
6 Yatse Notification Toggle: Quickly enable & disable notification forwarding to your Media Center. For example to disable SMS forwarding when watching a movie with friends.
7 Yatse MC Chooser: Quickly change the Media Center you are controlling.
8 Yatse Remote (4x2): Quickly control your media center from your Android home. See the remote part help for details on each buttons action.
9 Yatse Favourite: Directly access to your Yatse favourites.
10 Yatse Recent Movies: List the last added movies to your Media Center. (Can be configured to display random movies)
11 Yatse Recent TV Episodes: List the last added TV episodes to your Media Center. (Can be configured to display random TV episodes)
12 Current Media Center Indicator: Each widget have either a top left circle with the current media center color or have some text with current media center color, so you can easily know on what target media center widgets are tied.