Yatse Custom Commands
Yatse allows you to create unlimited custom commands to control your media centers and much more.
All possible Kodi command type are supported (Remote button, Keyboard key, Built-In and JSON-RPC see below).
The commands are not tied to a specific host but are associated with your host version, meaning all commands you add for a Kodi Krypton host will be available on all your other Krypton host, but you'll need to add other ones if you still have one Kodi Helix running.
The commands can be saved and restored with Cloud Save to never loose them, and instant access on any device.
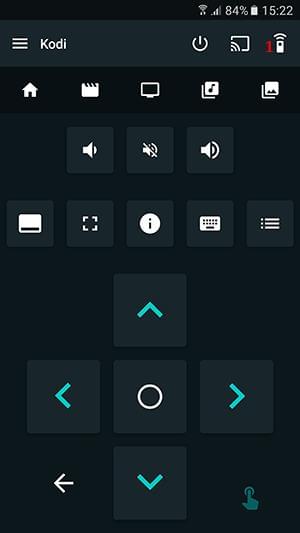
You can access the Custom Commands panels from the main view of the application either by clicking the ActionBar remote button in Remote screen, or by swiping from right of the screen when in main remote screen.
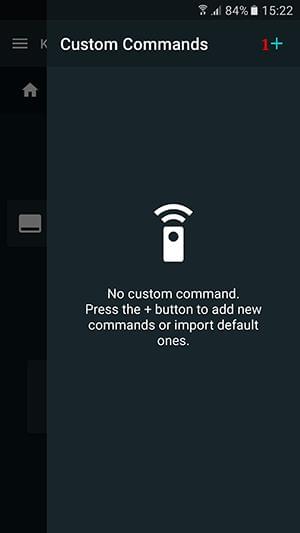
Press the + button in the Custom Command panel to add new custom commands or import default ones.
The menu can have new entries for each plugins that support Custom Commands.
Remember that you can reorder the commands by drag and dropping the commands with their left handler.
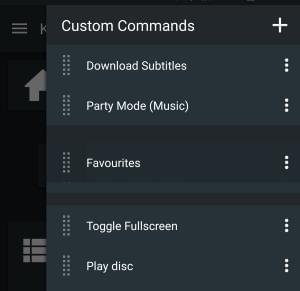
Commands can also be edited and removed by clicking the 3 dots on the right.
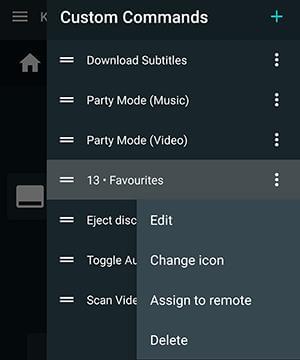
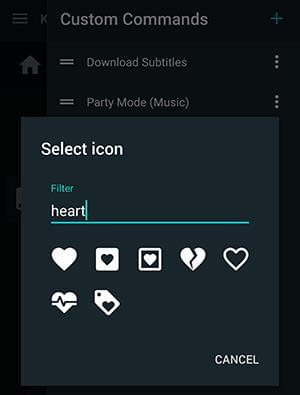
You can assign icons to Custom Commands and filter icons by name.
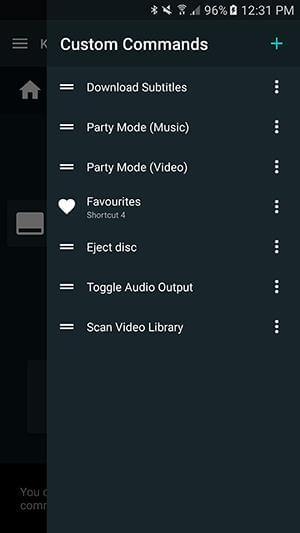
You can assign Custom Commands (Require Unlocker) to remote buttons for normal press and long press. Icons assigned to normal press will be shown on remote screen.
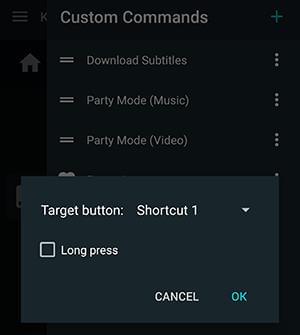
You can remap all non navigation buttons (normal + long press) for up to 30 assignable commands.
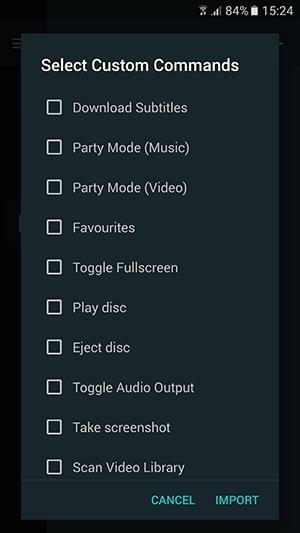
You can import some default commands for your current host by selecting Import default commands in the add menu. The commands will be same that where available in the additional command dialog in previous versions of Yatse.
Kodi API are quite distinct depending on what you want to achieve.
Yatse support all the 4 main API entries to Kodi so you can call any command to achieve your needs.

1, 2 Remote button / Keyboard key: Will use Event Server to send commands that are interpreted by Kodi as a corresponding physical device.
This will triggers the corresponding keymap action depending on the context.
You can see Kodi keymap information in details at: Kodi Keymap Wiki
3 Built-In Commands: Gives you access to all the internals of Kodi as available to skins
You can see Kodi built in information in details at: Kodi Built-In Wiki
4 JSON-RPC commands: Gives you access to the whole JSON-RPC api to fully control your Media Center.
You can see Kodi JSON-RPC information in details at: Kodi JSON Wiki
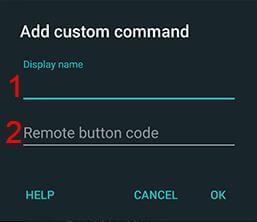
1 Display Name: The name that will be displayed in the Custom Command panel
2 Remote button code: The code to send to Kodi.
See Kodi Keymap Wiki §4.2
You can use for example left, enter, ...
Remark: Yatse send commands as "R1" - Xbox Remote type.
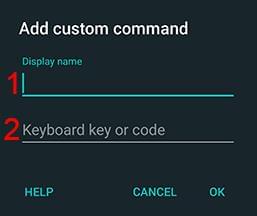
1 Display Name: The name that will be displayed in the Custom Command panel
2 Keyboard key or code: The key or code to send to Kodi.
See Kodi Keymap Wiki §4.4
See Kodi keynames Wiki
The key or code field can be either a single letter like l to rotate subtitles by default, or codes like *enter, backspace* that will be translated by Kodi to other key presses.
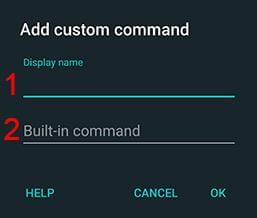
1 Display Name: The name that will be displayed in the Custom Command panel
2 Built-In command: The Built-In command to send to Kodi.
See Kodi Built-In Wiki
Tip: Built-In command Action(xxx) allow you to call any Kodi action with parameters (unlike JSON-RPC) Kodi Actions Wiki
Remark: The command must include () even if not passing parameters !.
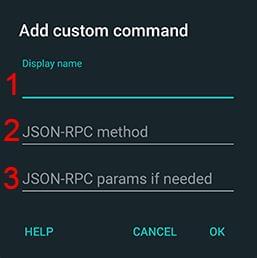
1 Display Name: The name that will be displayed in the Custom Command panel
2 JSON-RPC method: The method field of a JSON-RPC request to send to Kodi.
3 JSON-RPC params: The params field of a JSON-RPC request to send to Kodi.
See Kodi JSON Wiki for all Kodi supported commands and documentation.
Note: Yatse adds some boilerplate for you to simplify your typing.
If you want to add a command found on internet like: {"jsonrpc":"2.0","id":"1","method":"Player.Open","params":{"item":{"file":"Media/Big_Buck_Bunny_1080p.mov"}}}
You only need to set the method field to Player.Open and the params fields to {"item":{"file":"Media/Big_Buck_Bunny_1080p.mov"}}
Remark: The param field can be left empty if no parameters are necessary for the command, but it must start with { and finish with } if you enter a value.
This custom command allows you to send HTTP(S) GET, PUT or POST commands to any website.
Can be used for home automation or integration with Event Ghost for example.
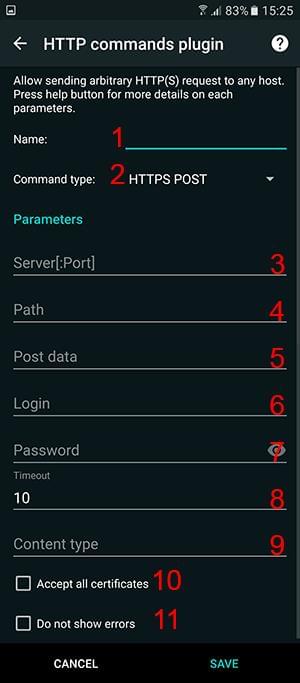
1 Name: The name that will be displayed in the Custom Command panel.
2 Command Type: Select the type of command HTTP or HTTPS and GET, PUT or POST. Parameters numbers will adapt depending on the command type.
3 Server:Port: Enter the server IP or hostname and the port if necessary. Do not enter the http(s):// prefix. (You can use %currenthost% place holder for the current media center ip/hostname)
4 Path: If you need to access a specific url enter it's path here. Must start with a /
5 Post data: If you are using a POST command, enter the POST data here.
6 Login: If your server needs basic authentication enter the server login here.
7 Password: If your server needs basic authentication enter the server password here.
8 Timeout: Enter the timeout of the command in seconds. Must be between 1 and 60.
9 Content Type: For POST commands, if your server needs it you can enter a Content-Type header value here.
10 Accept all certificates: For HTTPS commands, you can disable Android certificate checking to allow insecure connection.
11 Do not show errors: If your server does not return a valid response code, you can disable the error toast that will be shown.